Online Proofing Tool Guide
Welcome to your guide to the Solopress Online Proofing Tool. Whenever you upload files for us to print, our automated system will run essential checks and present your artwork back to you for a final once over. This guide shows you what you can expect as you advance through that process.
First things first
Don’t worry about uploading artwork until you’ve decided exactly what you want to order and selected all the options from the product page, such as size, paper type, finish, quantity etc.
We’ll only request your artwork once you’ve settled on the print you want and added it to your basket. From the basket page, simply click ‘Upload Artwork’.
Uploading your artwork
From your basket, you’ll be presented with the opportunity to browse your files to locate the artwork you wish to upload:

1 – Click on ‘BROWSE’ to access your folders and select the artwork file you wish to upload. Artwork files should be supplied in CMYK at 300dpi.
2 – Click on ‘VIEW PROOFS’ to submit your artwork file and continue to the online printing tool.
Once you’ve clicked ‘VIEW PROOFS’, a progress bar will appear to indicate that our system is preparing a proof of your artwork to be checked before you complete your order.
At this stage, if you’d prefer not to use the automated tool, you can click ‘I would prefer to skip proofing and have Solopress check my artwork’
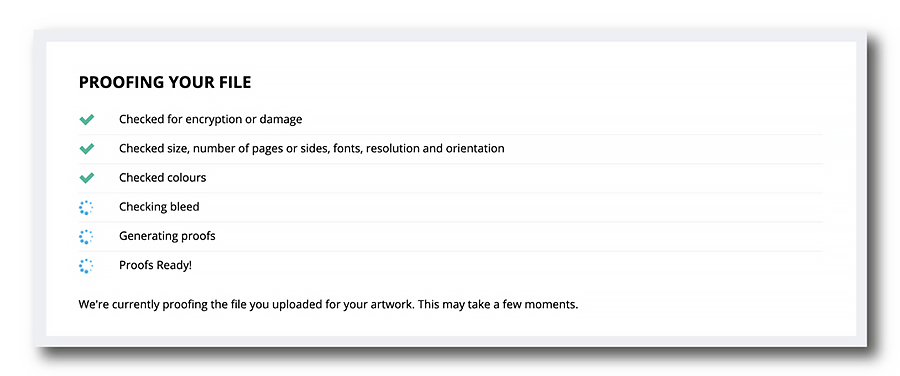
If you want to navigate around the site while you wait for us to create your proofs, the progress bar will remain at the top of the screen so you can keep track of how we’re doing.
The time it takes to create your proof depends on the file size. Larger files may take a few minutes to complete.

When your proof’s ready, the bar will display the ‘Artwork Proofing Complete’ message and you can click ‘VIEW PROOF’.
Proofing your artwork
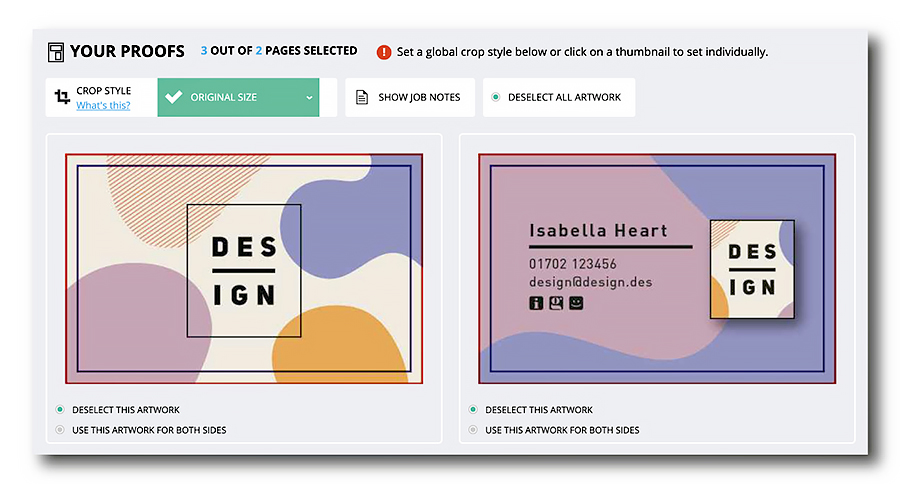
Once all your proofs are ready, you’ll see an image of your artwork on screen. By default, your artwork is displayed at the original size specified in your file. If you want your artwork to be automatically resized, click the down arrow on the green button that says ‘ORIGINAL SIZE’ and select ‘FIT TO CANVAS’ instead.
It’s vital that you thoroughly check the artwork at this stage, for full details on what to look out for, read our Proof Checking Guide.
The red line on your proof shows where your artwork will be trimmed. The blue line shows the boundary of the safe area. All essential text and design detail needs to be inside this area, as anything outside the safe area is at risk of being trimmed off.
The bleed area which extends 3mm outside of the red trim line is not shown in YOUR PROOFS so as to display a realistic view of the final print, but it is there. For more information on the importance of the bleed area, visit our Bleed Guide.
If you’re not comfortable with checking the proofs yourself, our design team will be able to review the artwork for you. Just press the ‘CANCEL’ button before you click ‘CONTINUE TO CHECKOUT’.
By skipping the online proofing tool, you’ll be leaving all pre-press checks to our team who’ll make sure everything’s aligned properly and ready for print. However, any creative tweaks will be out of your hands, and you won’t have an opportunity to view a final proof before print.
Selecting your artwork
If the file you’ve uploaded includes multiple images, you have the opportunity to deselect any pages that are not intended for print.
By de-selecting the ‘SELECT THIS ARTWORK’ button, the artwork you do not require will grey out and the corresponding page is no longer selected for print. If you change your mind, simply re-select the image.

If you have selected more pages than the product allows, an error message will appear and you won’t be able to ‘CONTINUE TO CHECKOUT’.
Approving your artwork
You’re then asked, ‘How would you like to proceed?’ with a choice of 3 options:
- Approve – select this option if you’ve thoroughly checked your artwork and you’re happy to go to print.
- Try Again – select this option if you’re not happy with your artwork and you’d like to amend it and re-upload.
- Skip Proofing – select this option if you’re not happy with your artwork and you’d like us to help you fix it.
When you’re happy with your artwork and ready to give your approval, simply select the box to accept the proof and click ‘CONTINUE TO CHECKOUT’.
You can then pay for your job and we’ll get on with printing your approved artwork.
Need Help?
Following these guidelines ensures that there will be no delays with your printing. If you have any problem, please don't hesitate to call our team on 01702 460047 who will be more than willing to help.