Foil Artwork Guide
This guide will show you how to supply artwork for items with a Foil finish. By following these few simple tips, you can ensure that we’re able to translate your vision into a striking piece of print.

Video guide
Two Golden Rules
There are two main aspects that make preparing artwork for Foil slightly different from normal. To make sure we’re able to recreate your design to your specifications and produce an attractive and durable print product, you’ll need to:
- Supply layered artwork with an extra page denoting where the Foil finish needs to be applied.
- Make sure your Foil areas stay clear of edges, folds and perforations to prevent flaking.
Let’s dive into a bit more detail about how to use these rules to design stunningFoil print.
An extra page for your Foil
When supplying artwork for a single-sided Foil finished product, you should prepare two pages of artwork:
- Page 1 should feature the CMYK artwork
- Page 2 should be the Foil artwork
Page 1 should feature all artwork elements, minus the Foil finished areas. We ask for CMYK artwork rather than RGB – a full explanation for this can be found in our Colour Guide.
It’s best NOT to use a different colour to denote the Foil area on your Page 1 CMYK artwork. This is in case it shows at the edges of the Foiled area on your final print.
Page 2 featuring the Foil artwork should be supplied as a vector file, with solid black areas denoting exactly where the Foil is to be applied. These areas should be 100% black, and not made up of cyan, magenta and yellow.
Be aware that any print areas on page 1 that are covered by the black area on Page 2 will be obscured by the Foil that’s applied to the surface.
Getting your pages in order
If your printed item requires Foil on one side, but regular print on both sides, you should supply a four-page pdf:
- Place your order requesting double-sided Foiling
- Supply artwork as a 4-page pdf
- Page 1, supply the CMYK artwork for side 1 (front)
- Page 2, supply the CMYK artwork for side 2 (back)
- Page 3, supply the Foil artwork for side 1 (front)
- Page 4, supply a blank page as no Foil is required on side 2 (back)
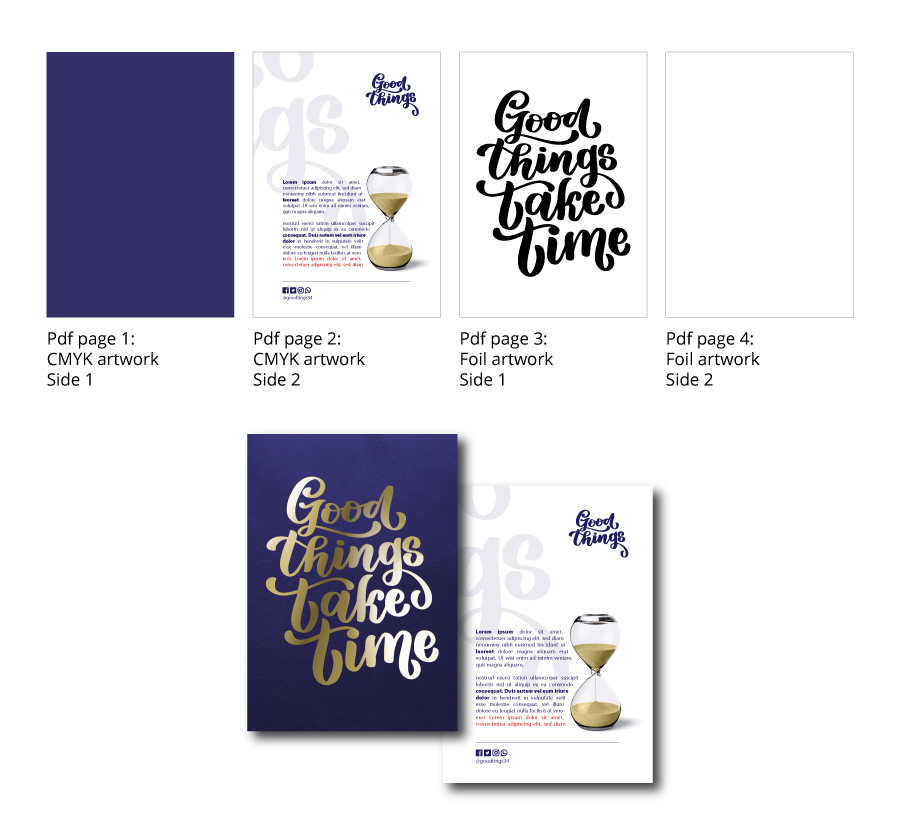
For Foiling on both sides, Page 4 should contain the Foil artwork for Side 2 (back).
Rest assured, you’ll only be charged for Foiling on sides where it’s actually used, so if you leave Page 4 blank, you’ll be charged for just one side of Foiling.
Stay clear of edges, folds and perforations
When preparing your vector files to show where the Foil finish should be applied, there are a few factors to bear in mind:
Foil areas should be entirely contained within the safe area. The boundary of the safe area is 3mm inside the cutter guide on all sides. For a full explanation of safe areas and cutter guides, refer to our Bleed Guide. Any Foil areas that stray outside the safe area may be trimmed through, resulting in an unfinished edge that will be prone to flaking.
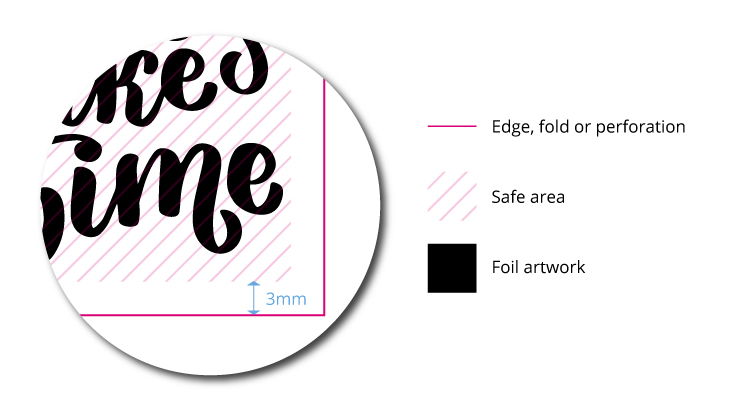
Foil areas must not cross any folds or perforation lines in your design. If any Foil areas continue across a fold or a perforation in your design, the finish is likely to crack and flake.
As long as your Foiled areas are enclosed within the safe area and away from folds and perforations, your finished print will shine on long into the future!
Need Help?
Following these guidelines ensures that there will be no delays with your printing. If you have any problem, please don't hesitate to call our team on 01702 460047 who will be more than willing to help.