Fonts Guide
From album covers to ads, lots of graphic design jobs put words and pictures together. Most design software will let you combine imagery with text, but that doesn’t always guarantee your fonts will look the same once you’ve submitted them for print. This guide shows you how to avoid the common pitfalls and preserve the font you want.
What happens when fonts aren’t present?
When a designer adds text to a document, it’s created using the fonts installed on that computer. When the same document is opened on a different computer, it may not have the designer’s original font installed. When this happens, the recipient won’t get to see the text as it was intended. It’s likely the original font may be replaced by a default typeface or otherwise not display properly.
For this reason, it’s vitally important that you thoroughly check the artwork during the proofing stage to make sure all text appears in the font you intended. For further proofing tips, check out our Proof Checking Guide.
How to avoid font problems
You can get around font issues by taking certain steps to integrate your desired font into your artwork document. The most widely used methods are to:
- Save text as an image
- Convert text to curves (also known as ‘convert to outlines’)
- Embed your text
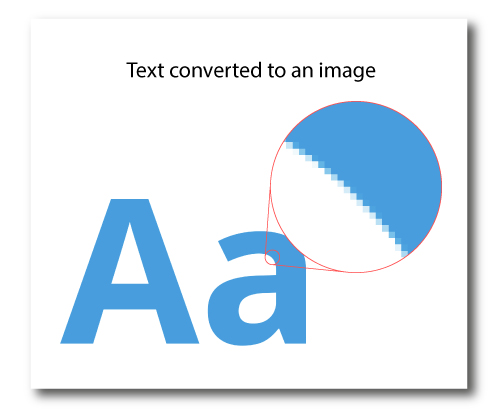
Save text as an image
One easy way to incorporate text and imagery is to export layered artwork as a flat image file once you’re done creating your document. By saving it as an image file like a JPEG or a PNG, the fonts become part of the image and won’t alter when the document is opened on another computer.
Keep that original layered artwork though, because any copy amends you make will have to be applied to the text layer, before exporting the file all over again.
Convert text to curves (also known as ‘convert to outlines’)
Converting to curves is another option for maintaining your chosen typeface and layout. Converting text to curves turns text into a series of shapes that are then dealt with in the same way as any other graphic element.
Design software that supports this kind of conversion will most likely require that you select the type object you wish to convert and click on a menu option called ‘convert text to curves’ or ‘convert to outlines’. Depending on the software you’re using, it’s likely to appear in a dropdown menu called ‘Type’ (in Illustrator), ‘Layer’ (in Photoshop), ‘Arrange’ (in CorelDraw), or similar.
This method is great for when you’ve used custom fonts on your project, but keep in mind that once converted, it can be difficult to go back and edit your content later. This is because, following conversion, your written content will no longer be recognised as text by your software.

Embed your font
Embedding can provide the best of both worlds – as long as you’re licensed to use the font in this way. The font will be part and parcel of your print-ready PDF and is sure to appear the same on other computers, and ultimately in print. However, because your font is still in a text format, you’ll still be able to amend your copy or refresh your message next time you want to use the artwork.
To embed a font into a PDF, you go to ‘File’ and select ‘Document Properties’, to open the dialogue bow. Click the ‘Fonts’ tab to display all fonts and embed whichever one is required.
However, you’ll only be allowed to do this with fonts that allow embedding. Those will tend to be standard fonts, fonts you’ve paid for, or fonts that are available freely for commercial use. It’s best to check the availability of fonts before creating your design to avoid setting your heart on a font that you aren’t licensed to use!
For instructions on how to supply artwork as a PDF (as well as all other file formats), take a look at our Supplying Artwork Guide.
Need Help?
Following these guidelines ensures that there will be no delays with your printing. If you have any problem, please don't hesitate to call our team on 01702 460047 who will be more than willing to help.